
How to Install & Configure BIND DNS on CentOS 8?

BIND DNS is a free and open-source project that can be used to deploy a DNS server. In this article, I’ll show you how to install BIND on CentOS 8 and configure it. Let’s move to step by step process.
My Setup
CentOS 8 installed on Vmware Workstation 15
Bridged Network adapter with my local network
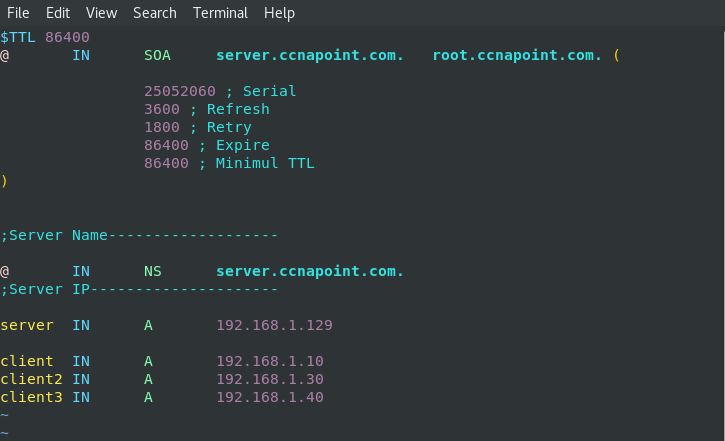
Server IP: 192.168.1.129/24
Hostname: server.ccnapoint.com
follow the below steps to install & configure BIND.
1. Install BIND on CentOS
Type the following command to install bind package on centOS 8.
sudo yum install bind bind-utils -y
After installing BIND you can simply check its version using the following command.
rpm -qa bind

2. Configure named.conf file
All configs related to BIND are stored in named.conf file. You can open it using your favorite text editor.
vim /etc/named.conf

Edit following fields in named.conf file.
listen-on port 53 { 127.0.0.1; <your_Server_IP>; };
allow-query { localhost; <your_network_ID_with_Subnet>; };
3. Make the Zone files.
Mainly, you need to configure two zone files for BIND.
- Forward Lookup zone file
- Reverse Lookup zone file
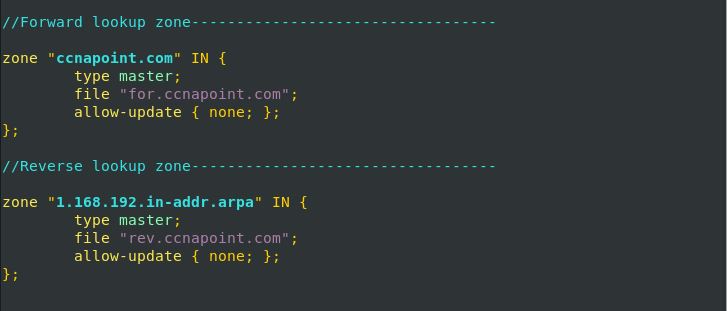
In the above example, for.ccnapoint.com is my forward lookup zone file. That use to resolve the hostname to an IP address.
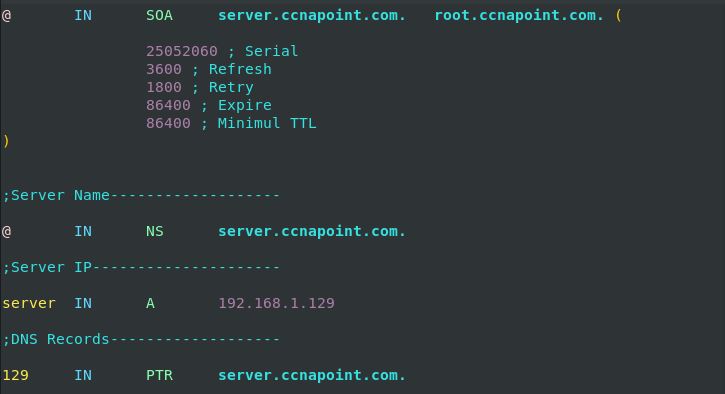
rev.ccnapoint.com is my reverse lookup zone file. Thant uses to resolve an IP address to hostname.
Now we need to make those files inside the /var/named/ directory.
for.ccnapoint.com file.
rev.ccnapoint.com
4. Configure Static IP for Server.
Static IP is important for any DNS server. In my setup, I configure all in the local network. I assigned 192.168.1.129/24 IP for my server.
Use the following commands to configure static IP in centOS.
Open network interface file using vim or nano.
vim /etc/sysconfig/network-scripts/ifcfg-ens33

Edit the following fields.
BOOTPROTO=none
IPADDR=192.168.1.129
NETMASK=255.255.255.0
GATEWAY=192.168.1.1
DNS1=192.168.1.129
DOMAIN=ccnapoint.com
Reload the network adapter with following command to apply the above changes.
nmcli connection down ens33
nmcli connection up ens33
That’s all for configuring the BIND DNS server on centOS 8. I’m planning to post a complete article about DNS zones in future days. If you have any problem, comment below.


hi!,I love your writing very much! percentage we keep up a correspondence more approximately your article on AOL? I need a specialist on this space to solve my problem. May be that’s you! Having a look ahead to see you.
I do believe all the ideas you have introduced in your post.
They’re very convincing and can certainly work. Still, the posts
are very short for starters. May just you please extend them a little from next time?
Thank you for the post.